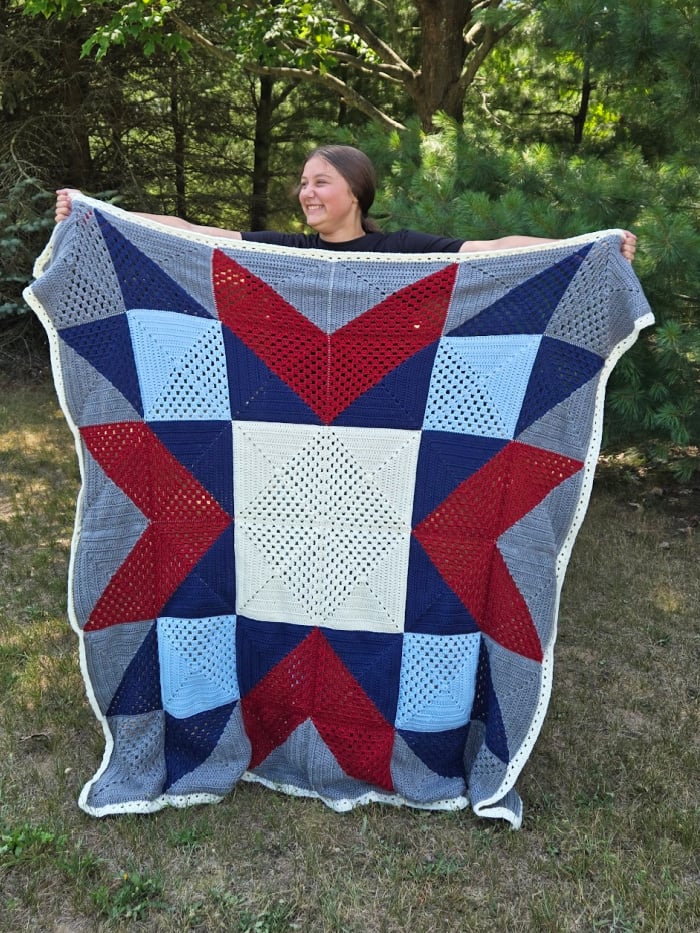

The Up North Throw is an easy granny square blanket pattern that was inspired by a traditional quilt square called the half square triangle! It uses a really fun square that is a half traditional granny and half solid. I’m sure you’ve seen a couple of variations of this before on my site.
We’ve been doing quilt-inspired crochet alongs all year.
Winter: Winter Waves Blanket
Spring: Sweet Lilac Blanket
If you don’t already know I live in Michigan and the one place us Michiganders like to go on vacation is “up north”. Now, this is a pretty subjective term; some say the U.P. is up north, some say it’s north of the 45th parallel, and some say it’s an hour north of where you currently live. I’m in the 45th parallel camp myself.
My favorite thing about heading north is that the farther you get from the big cities, the more stars you can see. That’s the inspiration for this season’s blanket. Our easy granny square blanket will consist of 36 blocks (9 inches each) arranged in a fun geometric star pattern. These unique granny squares are small enough to be portable and big enough that there are not a million of them.
2025 Pattern Update
The crochet along for this blanket has long since finished, but don’t let that stop you from making this fun crochet throw.
This blanket took years for me to finish… and not because it is a super complicated, huge, intricate pattern. Nope, it was my own procrastination and my brain convincing me that it was going to take forever to complete. In reality, once I got a good system down, it took a couple of short weeks of working on it between other projects.
Finishing this blanket was a major goal for me this year and I am so happy to free up that space it was taking up in my yarn storage area.
Granny Square Blanket Pattern Details and Information
The yarn I chose for this blanket was Caron Simply Soft. I wanted to pick something that was readily available. I love the color selection this yarn has. Its also super soft and has such a nice drape.
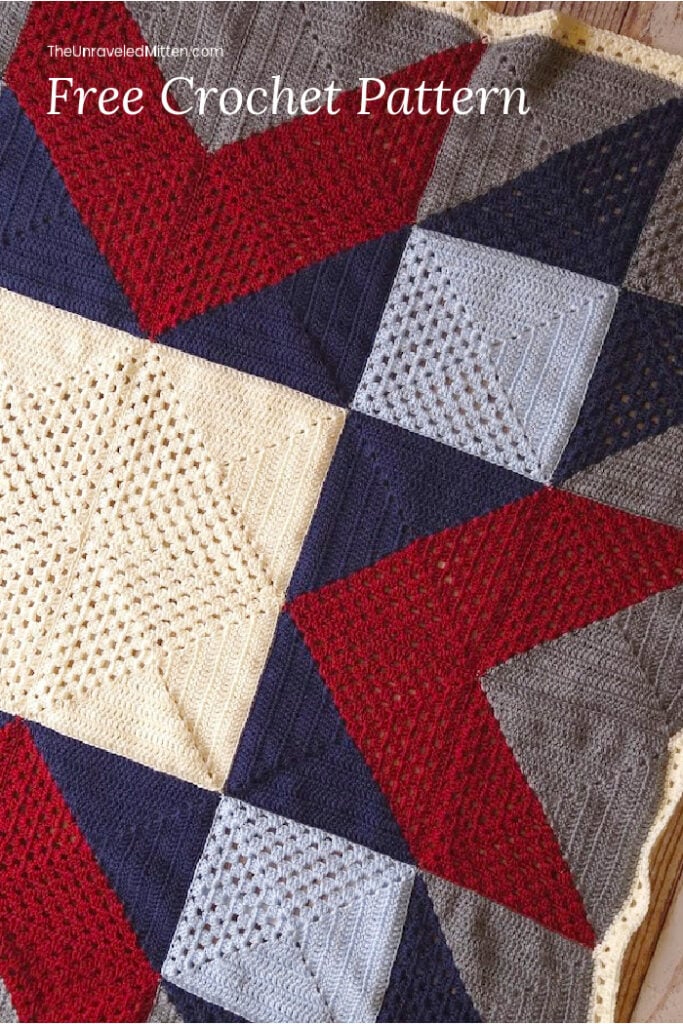
You’ll need 1 main color and 4 coordinating colors. I chose grey for my main color and a patriotic combination of red, navy, light blue and off white for my coordinating colors.
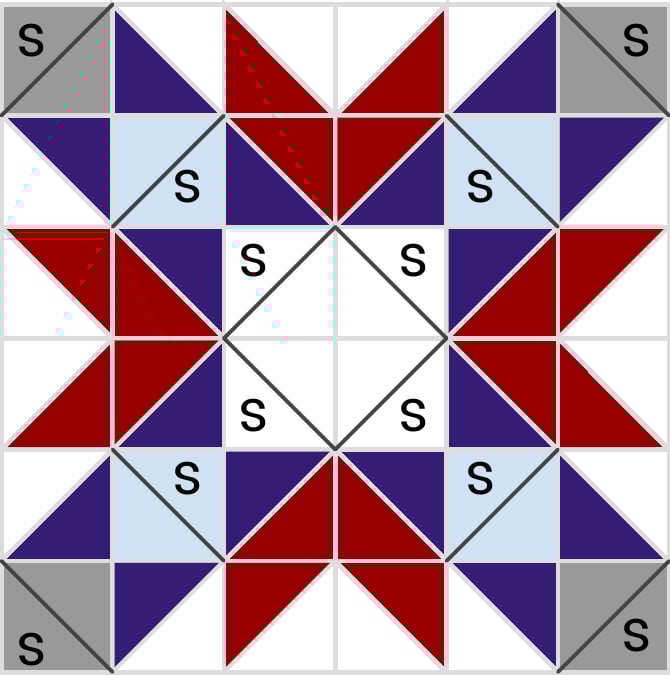
This geometric crochet design is a variation of the Wyoming Valley Quilt Block (scroll down to see graph!) and we are using these really fun half solid, half granny squares that I’m going to nickname Mixed Up Grannies. Once you get the hang of changing colors, this granny square pattern is easy and fun.
How to Crochet the Up North Quilt Inspired Granny Square Throw
Yarn: Caron Simply Soft or similar worsted weight yarn (some substitutions are Lion Brand Heartland, Red Heart Soft, Lion Brand Wool-Ease, Lion Brand Basic Stitch, Lion Brand Jeans, Knit Picks Brava Worsted)
Colors I’m using Caron Simply Soft in Grey Heather (main color), Autumn Red, Dark Country Blue, Soft Blue, Off White
Amounts:
Main Color: 1250 yards
Then you’ll need 4 other colors. 2 main (dark blue and red for me) and 2 accent colors( light blue and off white).
Main Coordinating Colors: 630 yds each
Accent Colors: 364 yds each
Joining and Border: 315 yds
For me this worked out to 5 skeins of main color (they’re 5oz skeins), and 2 -6oz skeins of each coordinating/accent color
You’ll also need
-5mm crochet hook
-scissors and tapestry needle
Finished blanket: Approx 58in x 58in
Each square measures: 9-9.5 in (blocking may be needed)
Abbreviations
- I use US Terminology
- Ch(s): chain(s)
- St(s): stitch(es)
- Dc: double crochet
- Sc: single crochet
- Sl St: slip stitch
- Mc: main color
- CC: coordinating color
Save this on Pinterest!

Notes
Ch 3 counts as dc
Always start your squares with the color needed for the solid portion.
When you’re making the solid color squares, ch 2 in each corner space rather than chain 1 and change color like the instructions say
Do not cut yarn when changing color, leave it behind your work and drop/pick up as needed
Number of Squares Needed
- Mc: 4
- MC (solid)/CC1: 8
- MC (solid)/CC2: 8
- CC1/CC2(solid): 8
- CC3: 4
- CC4: 4
-CC1 and CC2 are your main coordinating colors, CC3 and CC4 are your accent coordinating colors
Mixed Up Granny Square Instructions

Rnd 1: Using the color needed for solid portion of square, ch 5 and join to form ring. Ch 3, 2 dc in ring, ch 2, 3 dc, ch 1, change color (see notes for working one-color square), [3 dc, ch 2]x2. Join to beg ch 3 with sl st. Turn
Rnd 2: Sl st into corner space. Ch 3, 2 dc in corner space, ch 1, (3dc, ch 2, 3dc) in next corner space, ch 1, 3 dc in next corner space. ch 1. change back to original color, 2 dc in corner space, dc in each st along side to next corner space. (2dc, ch 2, 2dc) in corner, dc in each stitch along side to next corner. 2 dc in corner. ch 2. join to top of beginning ch 3 with sl st. Turn
Rnd 3: Sl st into corner space, ch 3, dc in corner space, dc in each st along side to next corner space, (2dc, ch 2, 2 dc) in corner, dc in each st along side, 2 dc in corner, ch 1, change color, 3 dc in corner, ch 1, (3 dc, ch 1) in each ch 1 space along side, (3 dc, ch 2, 3dc) in corner, ch 1, (3 dc, ch 1) in each ch 1 space along side, 3 dc in corner, ch 2. Join to beginning ch 3 with sl st. Turn
Rnd 4: Sl st into corner space. ch 3, 3 dc in corner, ch 1, (3 dc, ch 1) in each ch 1 space along side to next corner, (3 dc, ch 2, 3 dc) in corner, ch 1, (3 dc, ch 1) in each ch 1 space along side, 3 dc in corner, ch 1, change back to original color. 2 dc in corner, dc in each st along side, (2dc, ch 2, 2 dc) in corner. Dc in each st along side. 2 dc in next corner. ch 2, join to top of beginning ch 3 with sl st.
Rnds 5-9: repeat rnd 3 and 4. On last round finish off and weave in ends. Block to 10 inches (or so that all squares are the same size)
Joining and Border
I will be using the off white color for the joining and border.
Lay out squares according to the diagram above. For the squares that are one color only there’s an ‘S’ labeled where you should place the solid portion of the square.
With right sides facing slip stitch through the front loop of front square and back loop of back square. I found it helpful to go up a hook size to a 5.5mm for this.
Do this all the way across row. Finish off. Repeat for each row and then for vertical seams.
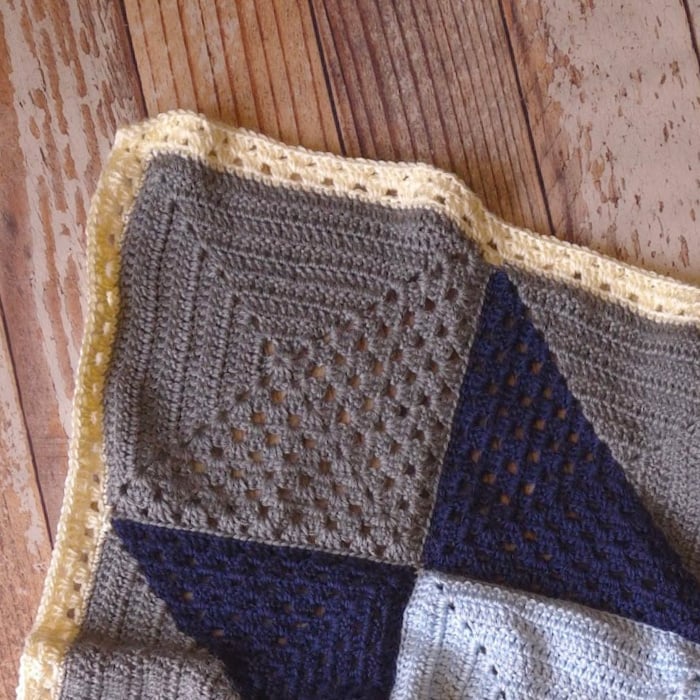
Granny Stitch Border
Rnd 1: Join yarn in any corner, Ch 1, (sc, ch 2, sc) in corner. Sc evenly around placing (sc, ch 2, sc) in each corner space. Join to top of 1st sc with sl stitch
Rnd 2: Slip stitch to corner ch-2 space. (ch 3, 2dc, ch 2, 3dc) in corner, *skip 2 sts, 3dc in next. Repeat around placing (3dc, ch 2, 3dc) in each corner ch-2 space. If you the count isn’t quite right and you need to only skip 1 stitch when you get to the corner it’s ok. Join to beginning ch 3 with sl st.
Rnd 3: Repeat round 2. Finish off. Weave in ends.
I can’t wait to see your blankets come together!!
Heather, I love your blanket!!! I, too, live in MI — Lansing area. The Up North debate is always ongoing. When I was a kid in the 1950s, Up North always started at Clare. I don’t know if was the vegetation or lack of major industry, but the air changed around Clare. It smelled fresher and like Up North. But real Up North was at my grandparents home near Traverse City.
I’m both a quilter and a crocheter so I love all your quilt copycat patterns. I’m loving the Tunisian squares now. Falling a little behind but hope to catch up soon. Thanks for your patterns.
I live in Allegan and will be starting this in the fall. Thanks!😊
You’re welcome!
Oh my goodness – I love this!! Thank you! Born and raised in Detroit, Michigan, now retired and still crocheting in the little town of Mesquite, NV. Just signed up for your newsletter and can’t wait to start this adventure.
If I buy the pattern from Ravelry is the chart going to be in color as shown above or will it be just the outline pattern so I can write in my own colors?
I have purchased it and it is the colors that heather used. But if you look on the facebook page someone shared a blank outline so that you can use your our colors.
I’m a michigander also. So I can’t wait to start this. But unfortunately I do need to. Have 2 other afghans I have to make for others before I start. But thanks for sharing a nice new project.
Hi, I love this idea for a throw. I grew up in the Upper Peninsula and now live in the lower Peninsula of Michigan.
I have a question. I am missing something. How do you know which color should be the solid color of the square?
Thank you for your help.
Jean
Thank you! It says which color should be solid in the list of how many squares you need.
Thank you, I looked through pattern but missed that part.😀
You had me at “Wyoming”.. though I know you probably mean a location in Michigan.. whereas I choose to believe you meant my home state 😀 Can’t wait to get started!
I definitely meant your homestate! Just coincidence that it happens to be a city in MI . 😊😊